How to Install the On-Premise Version of the Forensic OSINT Backend
This guide will walk you through installing the Forensic OSINT backend, whether you're setting it up on a local machine (laptop/desktop) or deploying it on an internal server environment.
⚠️ BETA Notice:
The Forensic OSINT On-Premise Backend is currently in BETA testing.
Major updates, including breaking changes, may be introduced during this phase.
These changes could impact data compatibility, meaning existing captures may not automatically transfer to the final version upon release.
Future versions will not support importing current captures. Only proceed if you are aware of these risks.
Remember, you can still download and back up all captures as you do with local downloads.
Prerequisites
Before starting the installation, ensure that you have the following:
- Docker: The Forensic OSINT backend uses Docker to create and run containerized environments. If you do not have Docker installed, visit the Docker website, which will automatically detect your operating system and provide the correct version for installation.
- System Requirements: Ensure your machine meets the following minimum specifications:
- 2 CPU cores
- 8 GB of RAM
- 20 GB of free disk space
- Access to a Terminal/Command Line:
- Windows: Command Prompt or PowerShell (run as Administrator).
- macOS/Linux: Terminal.
What is Docker?
Docker is an open-source platform that simplifies the process of developing, shipping, and running applications.
To learn more about Docker and why it is used for the Forensic OSINT Backend (BE), click here.
Choosing the Installation Location
The Forensic OSINT backend can be installed on either:
- Local Machine: For individual users, the backend will most likely be installed on the same computer where the Forensic OSINT Chrome Extension is used.
- Central Server: For organizations with multiple users, the backend should be installed on a central server that all users can connect to. This setup allows users across the organization to sync their captures to a shared database.
For server installations, ensure that the server can be accessed through the network and consider configuring a static IP address or internal domain name for ease of access. You may also need to configure your firewall to allow communication with the server.
For more detailed guidance on setting up your server for multiple users, including firewall configurations and static IP setup, click here.
Install & Setup Guide
1. Install Docker
Ensure Docker is installed on your system by visiting the Docker website.
The site will detect your operating system and provide the appropriate version for installation.
2. Download & Extract the Setup Scripts
Download the setup scripts as a ZIP archive, and extract it to a folder on the machine or server where you want the backend installed.
Once downloaded, extract the contents of the ZIP archive before proceeding to the next step.
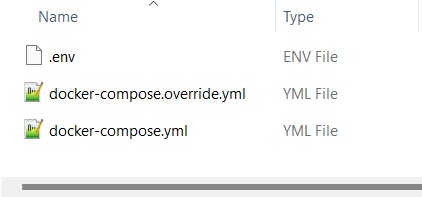
3. Edit Environment Variables and Run Docker Compose
In this step, you’ll configure the necessary environment variables for your installation and start the backend using Docker Compose.
Step 3.1: Edit the .env File
To configure the backend, you need to modify the .env file. This file contains essential settings for your organization’s configuration:
- Open the .env file located in the installation folder, using any text editor.
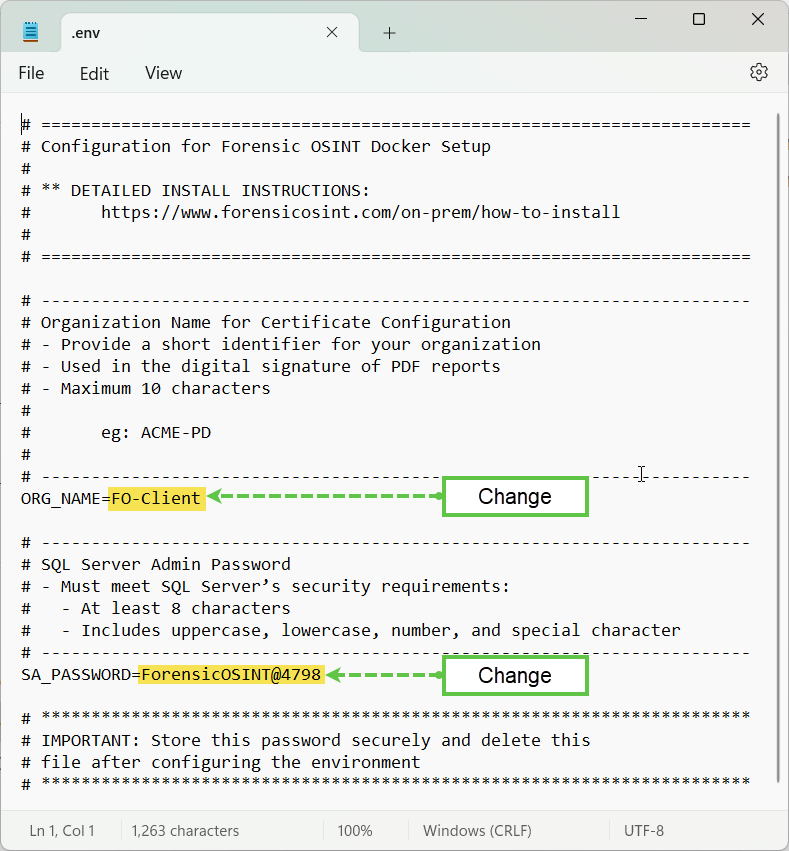
- Edit the following fields to suit your organization:
- ORG_NAME: Provide a short identifier for your organization (e.g.,
FO-Client). This name will be included in the digital signature for PDF reports. - SA_PASSWORD: Set a secure SQL Server Admin password that meets the required complexity:
- At least 8 characters
- Includes uppercase, lowercase, numbers, and special characters
- ORG_NAME: Provide a short identifier for your organization (e.g.,
Important: Store this password securely as it cannot be recovered later.
Refer to the image below for an example of how to edit these fields:
Step 3.2: Save and Run Docker Compose
- Save the .env file after making your changes.
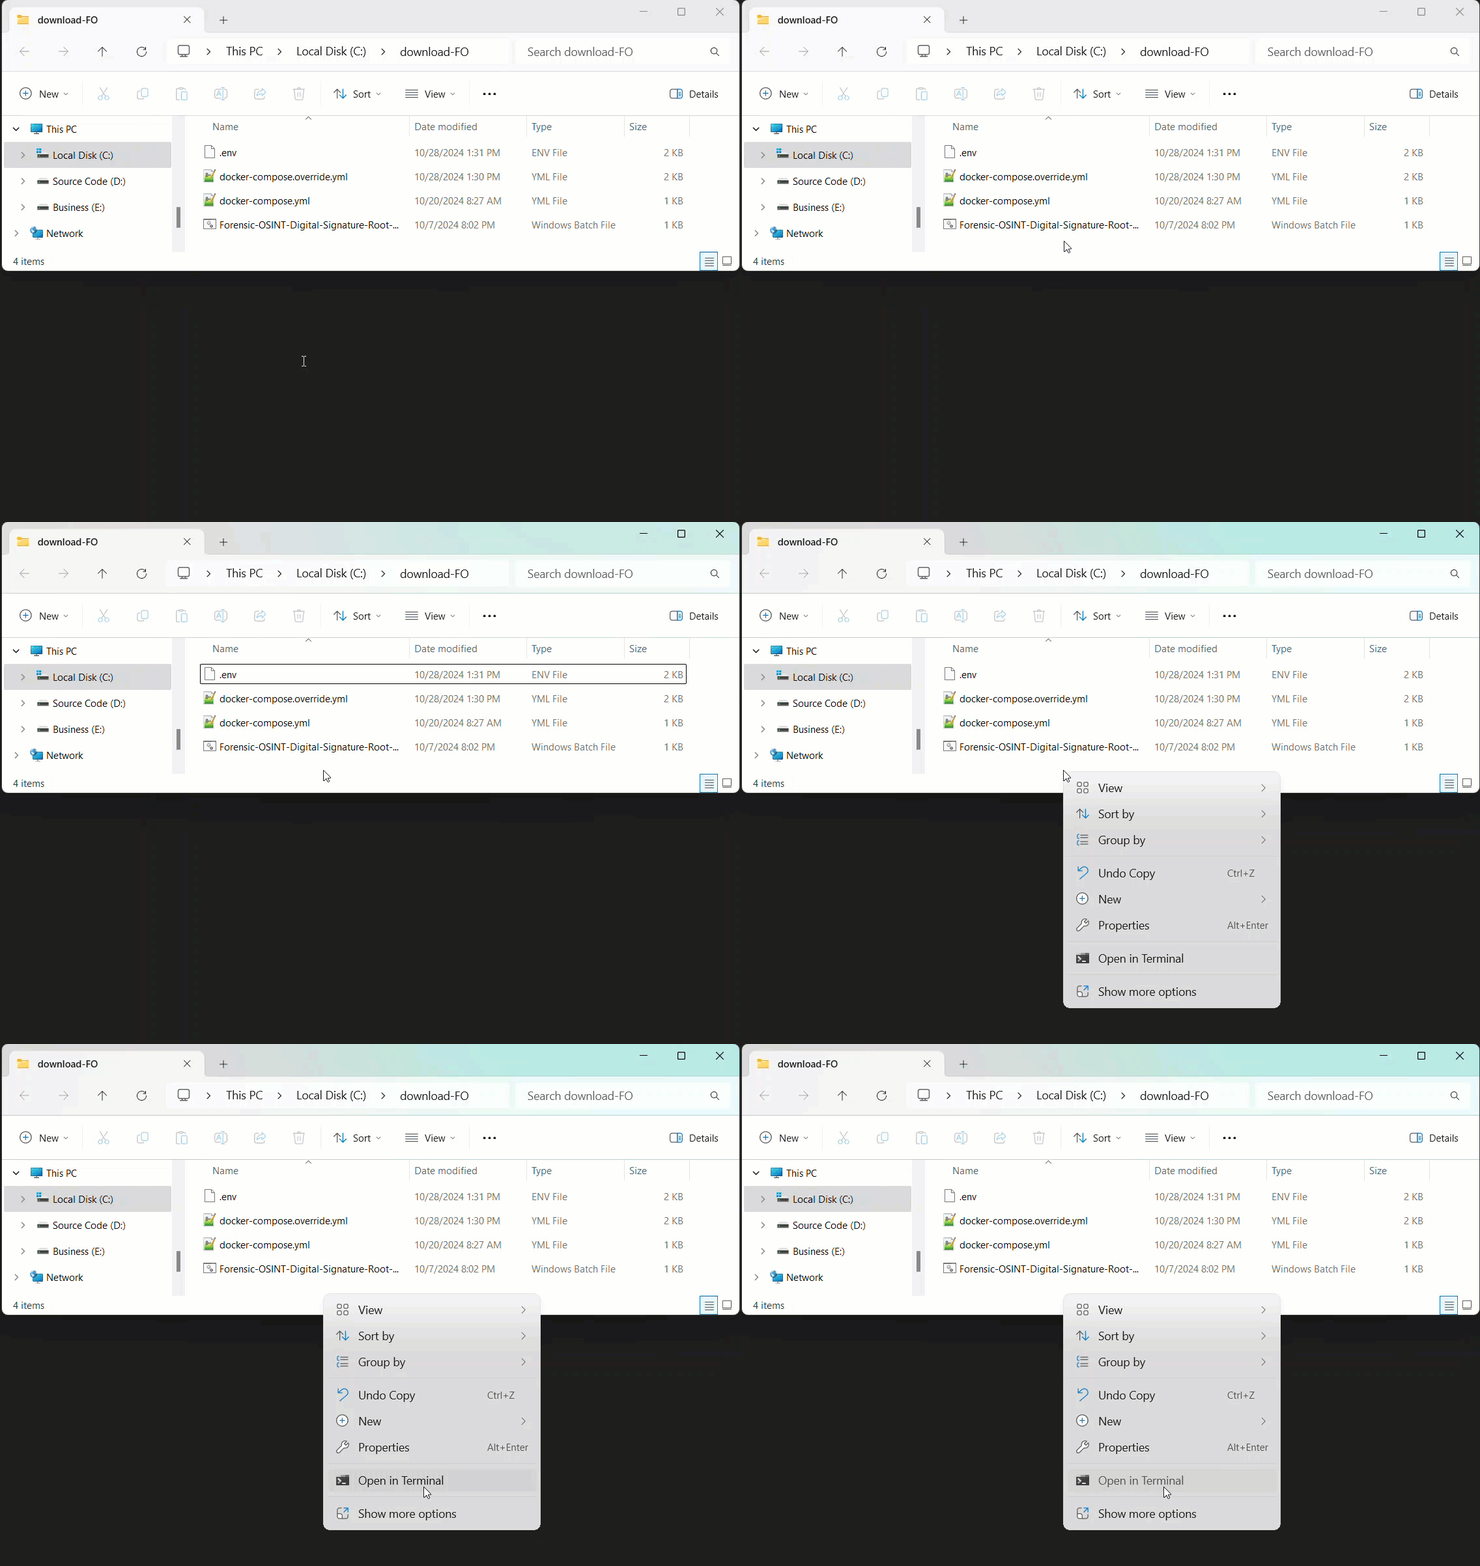
- Open a Terminal or PowerShell window in the same directory where the Docker Compose files are located.
You can do this by right-clicking inside the folder and selecting "Open in Terminal" (or "Open PowerShell here" on Windows).
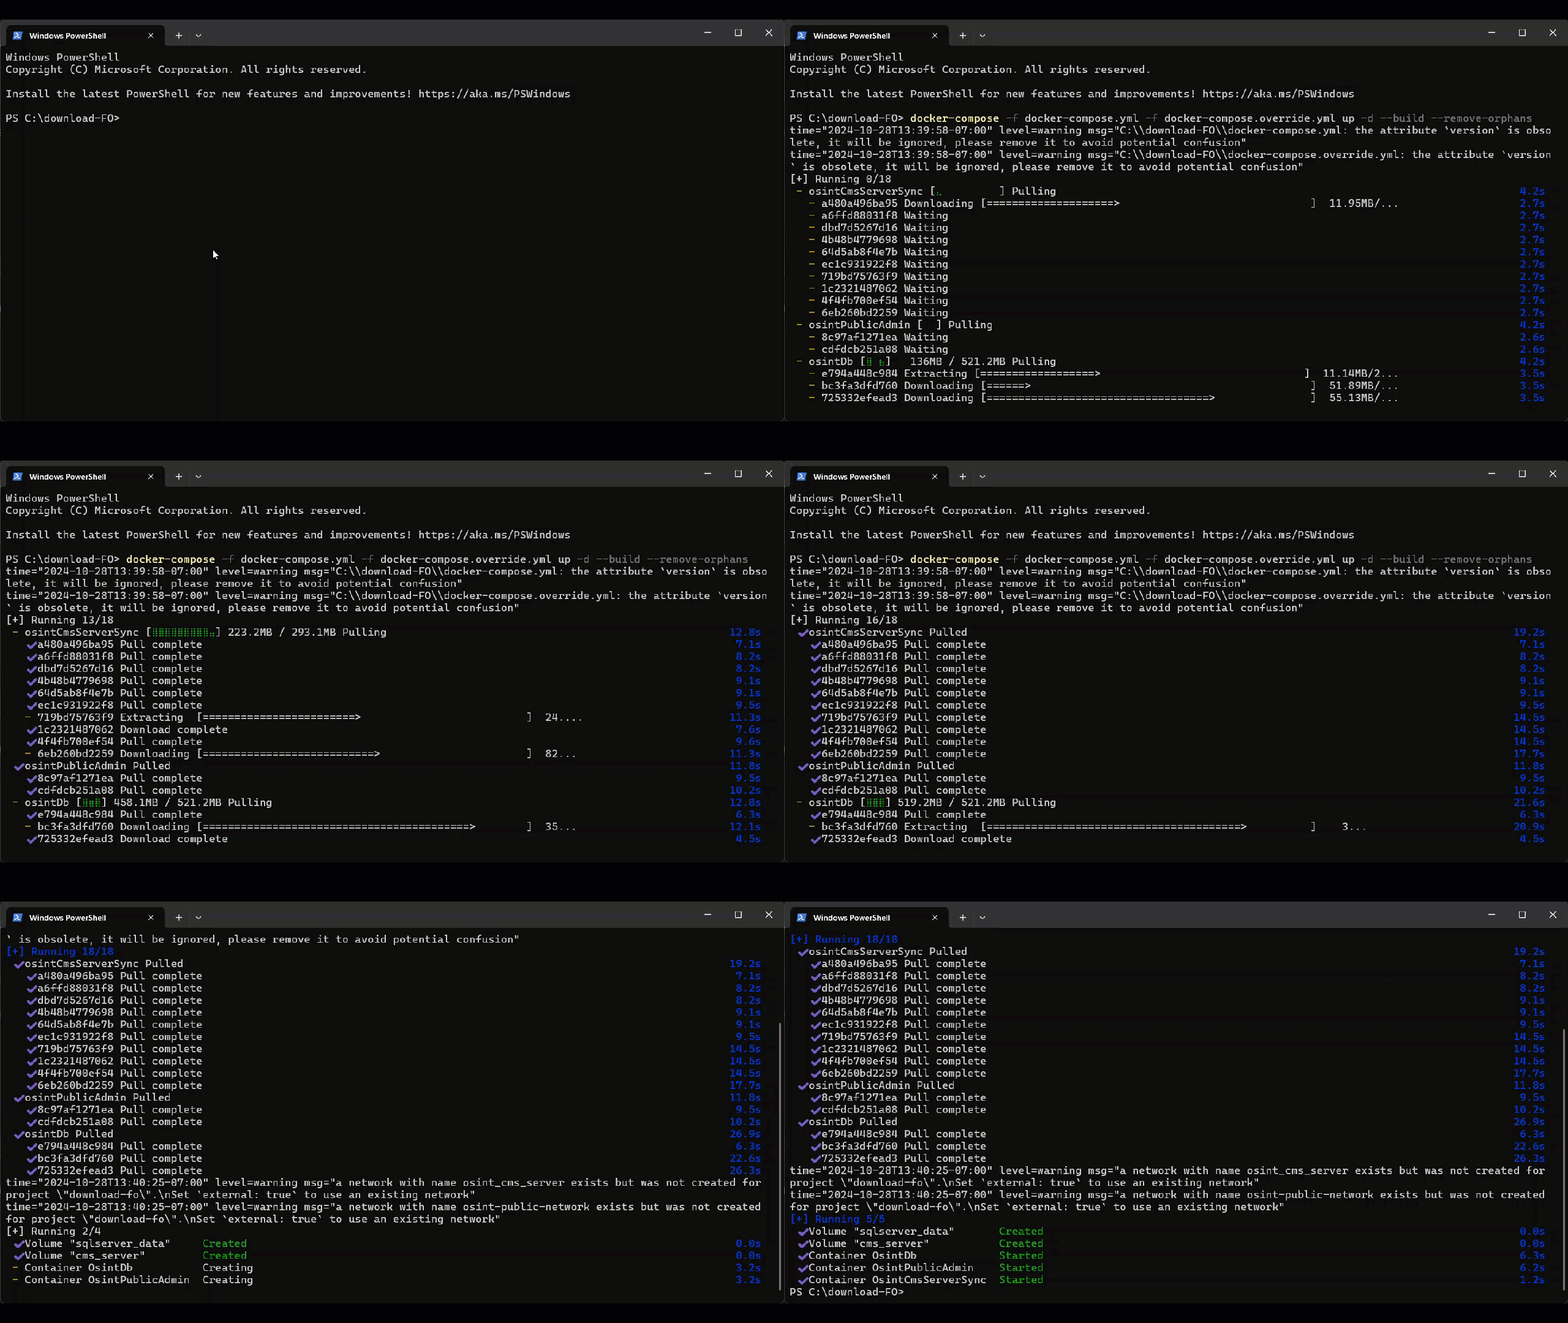
- Run the Docker Compose command to start the backend setup:
docker-compose -f docker-compose.yml -f docker-compose.override.yml up -d --build --remove-orphansRefer to the GIF below to see how to run this command in Terminal:
Result
Once the command completes, Docker will set up and run the backend services.
Proceed to the next steps to verify everything is working correctly.
4. Confirm Docker Installation
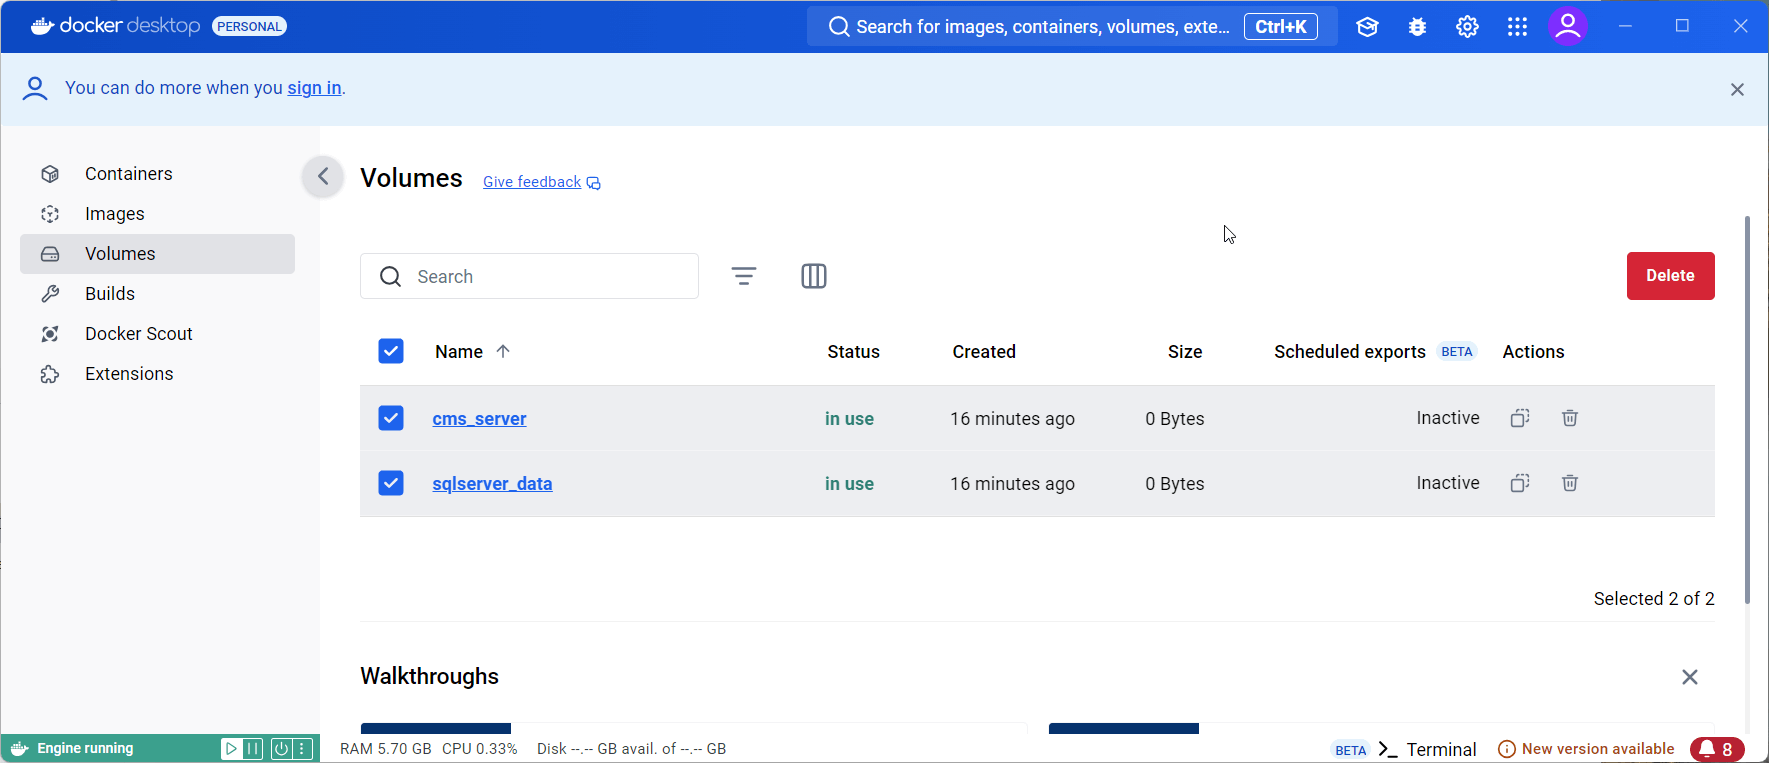
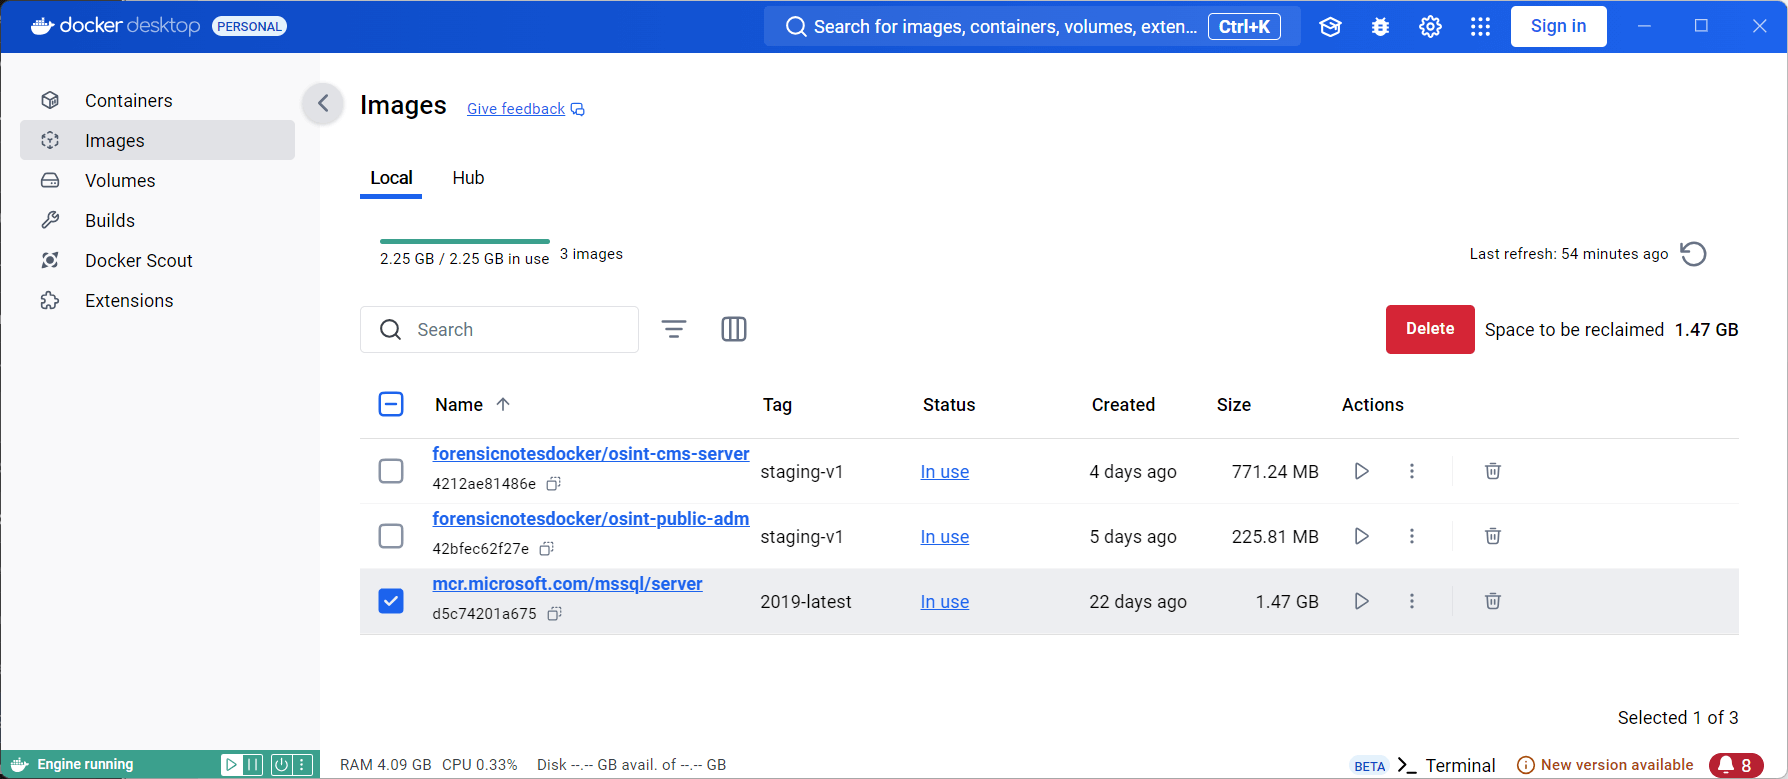
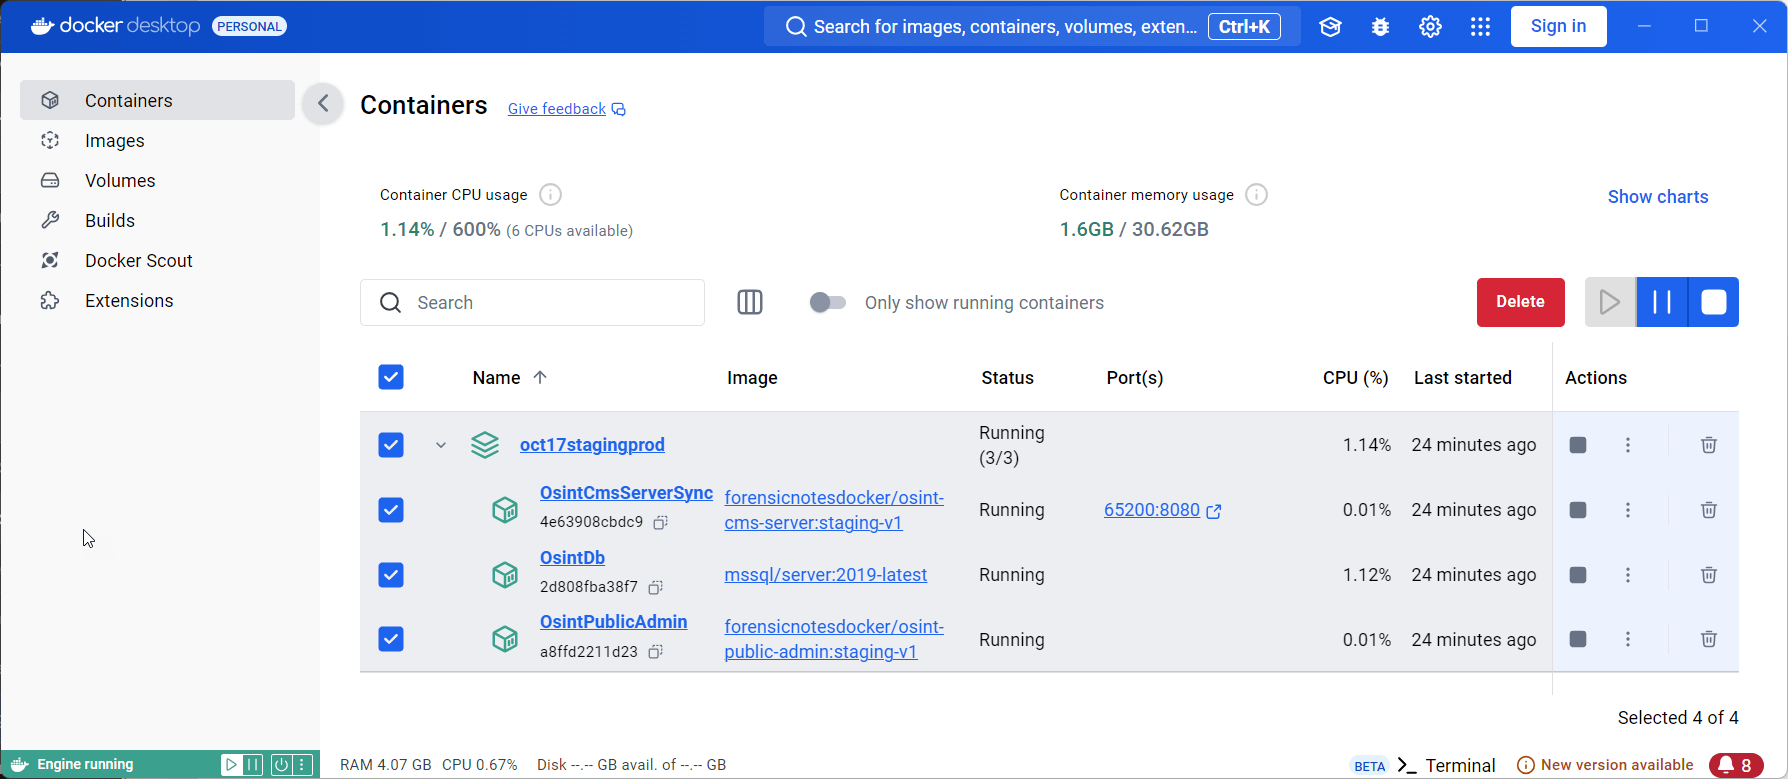
Once the setup script is successfully run, you should see the following in Docker Desktop. This will confirm that everything is installed and running correctly.
Volumes:
The cms_server and sqlserver_data volumes should be visible under the Volumes tab in Docker, indicating that the data is being correctly stored.
Images:
You should see the following Docker images for the OSINT backend and SQL server listed in Docker Desktop. These images are required for running the backend services.
Containers:
The backend containers for OSINT CMS and SQL Server should be running. This is shown in Docker Desktop under the Containers tab. The ports, including the backend port (65200), should be active.
By confirming these volumes, images, and containers in Docker, you can be sure that the backend is fully installed and running properly.
Mac Computers
Installing on Apple Silicon Macs (M1/M2)
For users with newer Apple Silicon Macs (M1 or M2, introduced in 2020 and beyond), Docker may require additional configuration to run the Forensic OSINT backend. This setup should work out of the box on Intel-based Macs, but newer Macs using Apple Silicon may need to enable a specific setting in Docker to ensure compatibility with x86/amd64 containers.
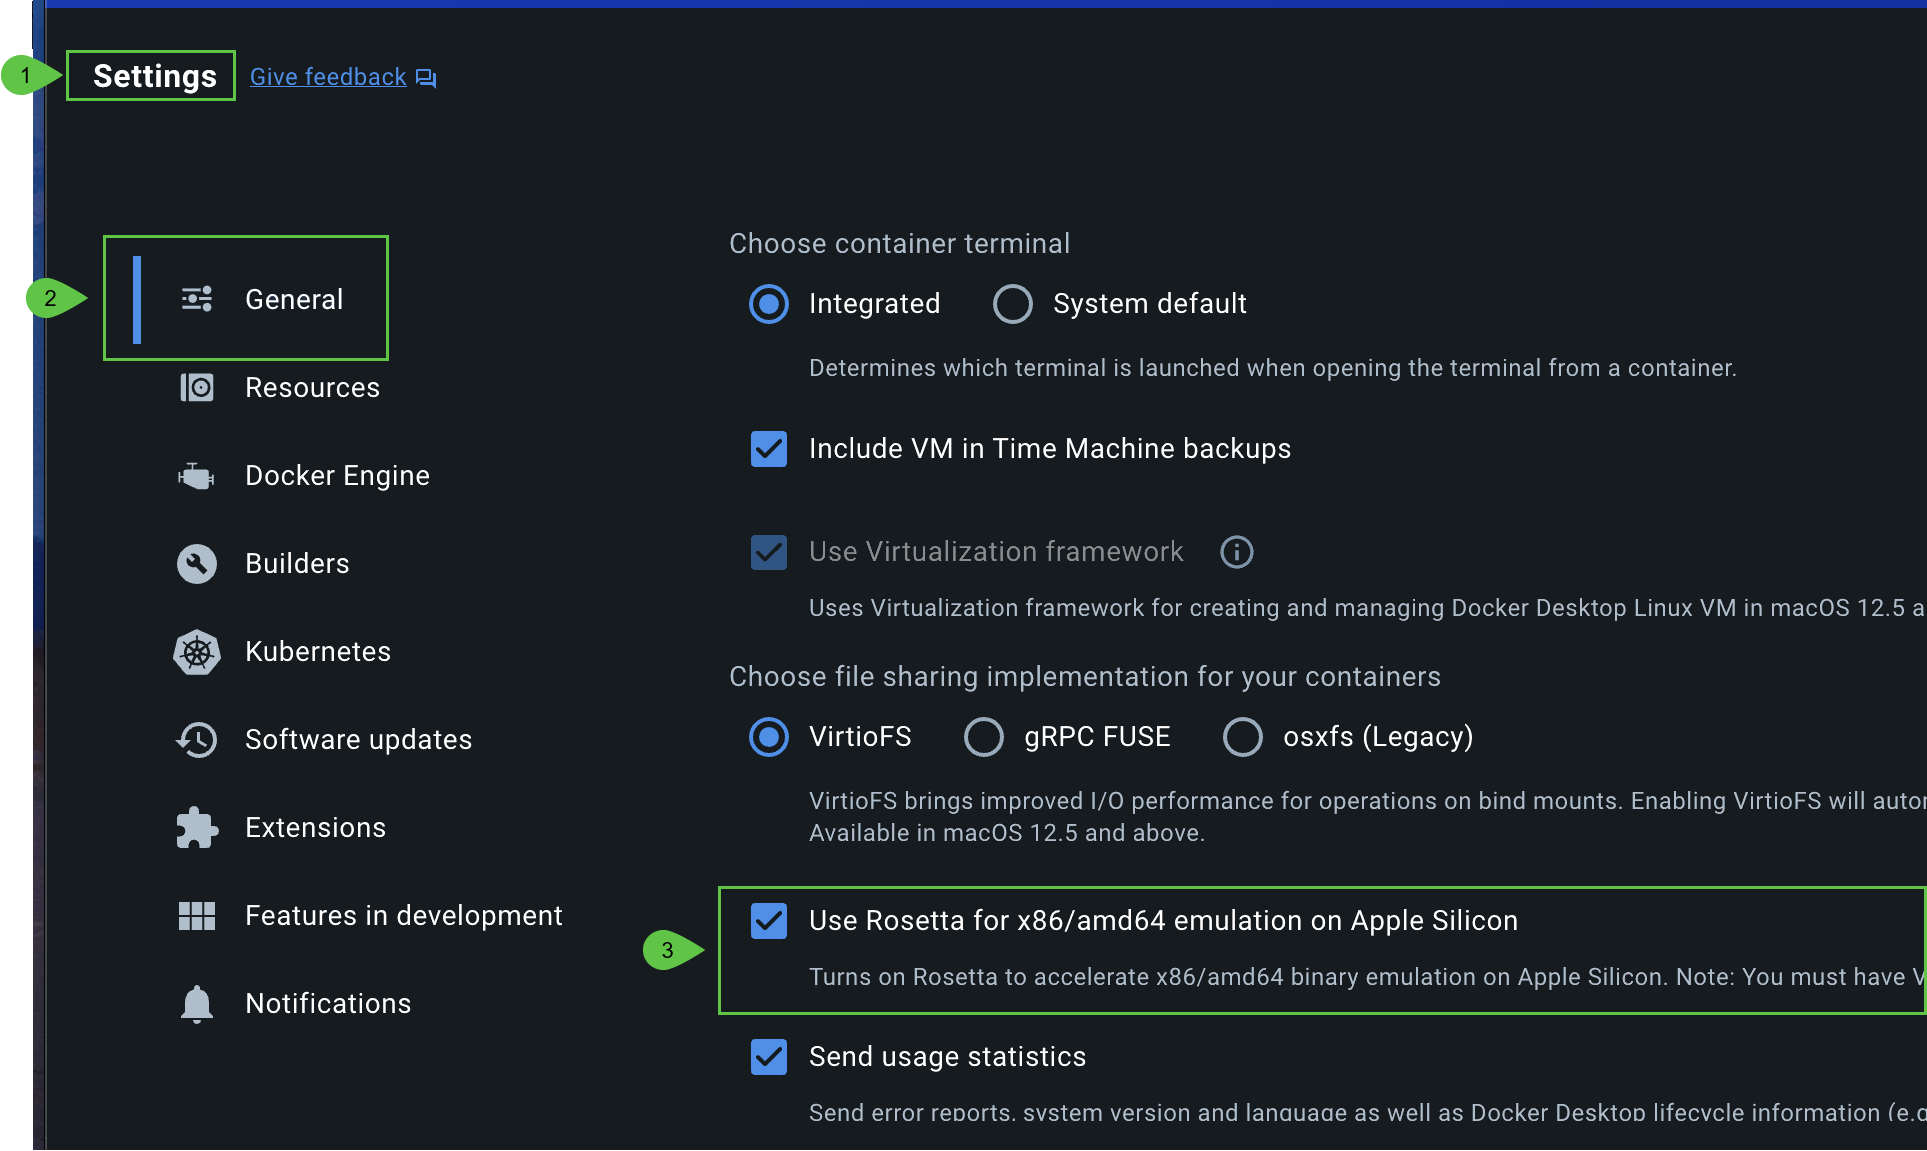
Steps to Enable Rosetta for x86/amd64 Emulation:
- Open Docker Desktop on your Mac.
- Go to Settings > General.
- Scroll down to find the option Use Rosetta for x86/amd64 emulation on Apple Silicon.
- Check the box to enable this setting, as shown in the image below.
This setting will allow Docker to use Rosetta to emulate x86/amd64 architecture, which is needed for running some applications on Apple Silicon. For more information on this solution, refer to this Stack Overflow article.
Note: This setting is only required for Apple Silicon (M1/M2) Macs. If you're using an Intel-based Mac, this step is not necessary.
5. Enable Syncing in the Chrome Extension
To enable syncing with your backend, follow these steps:
- Open the Forensic OSINT Chrome Extension, go into the Case Managment System (CMS) and click on the settings icon (#1)
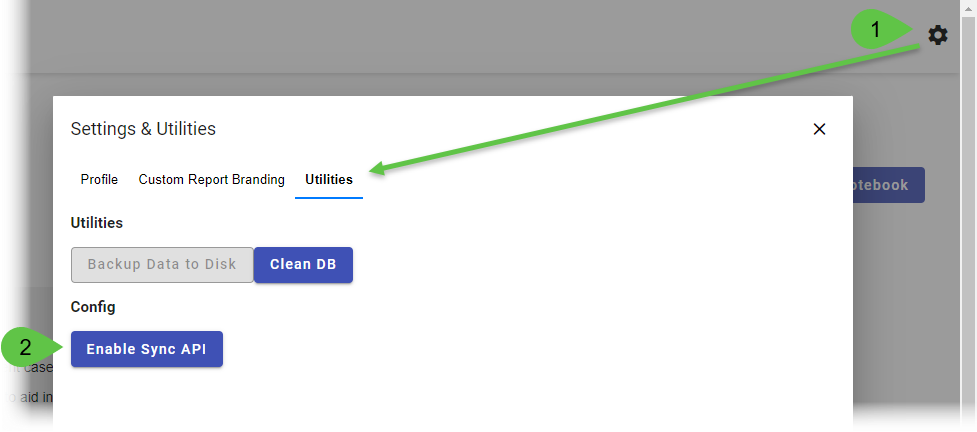
- Go to the Utilities tab.
- Click the Enable Sync API button (#2).
- Ensure the Backend URL is set to:
http://localhost:65200Note: If you've installed the backend on a different server within your network, you will need to replace
http://localhost:65200with the actual network address of that server (e.g.,http://your-server-ip:65200) to ensure proper connectivity.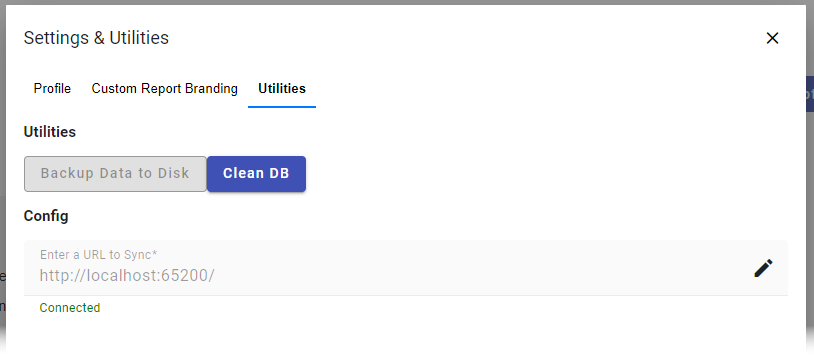
This URL will allow your captures to sync automatically to the local or network backend.
6. Confirm API is Running (Optional)
To verify that the backend API is running, open your browser and visit:
http://localhost:65200If the page loads successfully, the backend API is up and running. No further action is needed unless troubleshooting is required.
🔐 Digital Signature Verification (Recommended)
To ensure that all digitally signed PDFs generated by Forensic OSINT are marked as trusted in Adobe Reader and other PDF viewers, please install our Root and Intermediate Certificates.
These certificates allow your system to recognize that the PDF was generated by Forensic OSINT and that the contents have not been altered since creation.
✅ Why this matters:
- Without these certificates, PDF viewers like Adobe Reader may display a warning or show the signature as "unknown."
- Installing our certificate ensures a seamless experience, showing the green “Trusted” checkmark and providing confidence in the integrity of your reports.

Minimum Requirements:
- 8 Characters
- 1 Upper
- 1 Lower
- 1 Digit

